Difference between revisions of "HeRo"
(→Set up ROS Workspace) |
(→Connect with HeRo) |
||
| Line 71: | Line 71: | ||
Now turn it on the HeRo, it should connect automatically in the network. The robot will blink blue for 2 seconds if it is connected to the network, otherwise it will keep blink in red. | Now turn it on the HeRo, it should connect automatically in the network. The robot will blink blue for 2 seconds if it is connected to the network, otherwise it will keep blink in red. | ||
| + | |||
| + | === HeRo Teleoperation === | ||
| + | With the HeRo connected to the network. Launch the bringup and teleop to start sending velocity commands to the hero on your desk! | ||
| + | |||
| + | <> | ||
Revision as of 14:29, 13 November 2024
Contents
HeRo
This project contributes to an open source ROS-based framework for swarm robotics. We propose an low cost, high availability swarm system that could be printed and assembled multiple times without special knowledge or hardware skills.
Main Page: https://verlab.github.io/hero_common/ros/
GitHub: https://github.com/verlab/hero_common/
HeRo ROS Tutorial
In this tutorial, we will create a new script to navigate the HeRo and utilize its sensors to avoid obstacles. To follow along, you must have ROS installed; for this tutorial, I will be using ROS Noetic.
The HeRo main page already has excellent tutorials for setting up the HeRo. You can follow the steps here:
Alternatively, you can follow this tutorial, which will focus primarily on the ROS setup and development aspects. For the purposes of this tutorial, we will configure HeRo as we would with any other ROS package
Set up ROS Workspace
Create a new ROS workspace. Notice you can use catkin build or catkin_make commands, choose one.
mkdir -p ~ ws_hero/src
cd ws_hero
catkin build
Download the package to ws_hero/src and build it from source. This is common to do for installing ROS packages.
cd ~/ws_hero/src
git clone https://github.com/verlab/hero_common.git
cd ..
rosdep install --from-paths src/hero_common --ignore-src -r -y
catkin build
source devel/setup.bash
If you encounter issues in later steps, you may need to select the repository branch of your ROS distribution, see HeRo Installation Guide. You also may need to install the NVIDIA Container Toolkit. To test if the package is correctly installed, try launch the bringup:
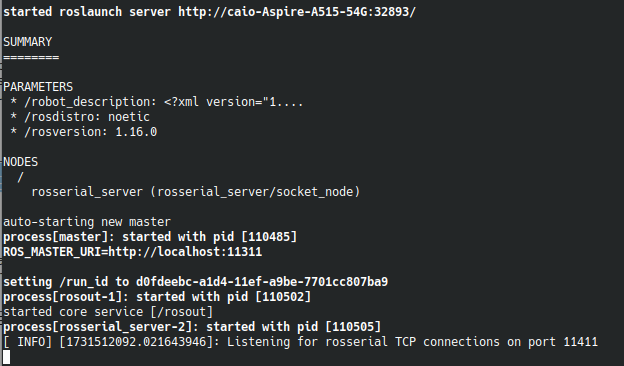
roslaunch hero_bringup hero_bringup.launch
Because we haven’t configured the HeRo robot yet, it will currently search for TCP connections without successfully connecting. However, the launch process itself should still succeed. If everything was set up correctly, you should see the following output in the terminal:
You can exit the terminal.
Connect with HeRo
The HeRo ROS Setup Guide on the main HeRo page provides detailed instructions on connecting your computer to the robot. We summarize the main steps below for quick reference.
- Create a network Hotspot on your PC
- Set SSID and Password as desired, by default HeRo should connect in a network with SSID = rezeck, password = s3cr3tp4ss.
- If necessary, set these other Hotspot informations:
- mode: access point;
- band: automatic;
- wifi-security: WPA/WPA2 Personal - store password for all users (not encrypted);
- ipv4 shared to other computers;
- ipv6 automatic.
- Configure HeRo network
- Turn on HeRo in configuration mode: cover all sensors and flip the switch to turn it on. HeRo will blink in purple;
- Connect any device to the HeRo wi-fi network, password should be s3cr3tp4ss;
- Open in a browser 192.168.4.1 to open the HeRo configuration page;
- Set the SSID and Password that you gave to your Hotspot, HeRo will try to connect to this network;
- Save and turn-off HeRo.
Now turn it on the HeRo, it should connect automatically in the network. The robot will blink blue for 2 seconds if it is connected to the network, otherwise it will keep blink in red.
HeRo Teleoperation
With the HeRo connected to the network. Launch the bringup and teleop to start sending velocity commands to the hero on your desk!
<>

